Excitel platform offers many functions and settings to the user that can be managed from Personal account. In this article we will describe which sections are there and how to adjust various components of the service for the needs of your business.
Profile
After you've logged in, the "Profile" tab is displayed by default. This is the user card which contains all the necessary information: name, email address, the language of use, the name and address of the company (an optional field). On the right of the "Profile" the current tariff plan is displayed with brief information about corresponding functionality.
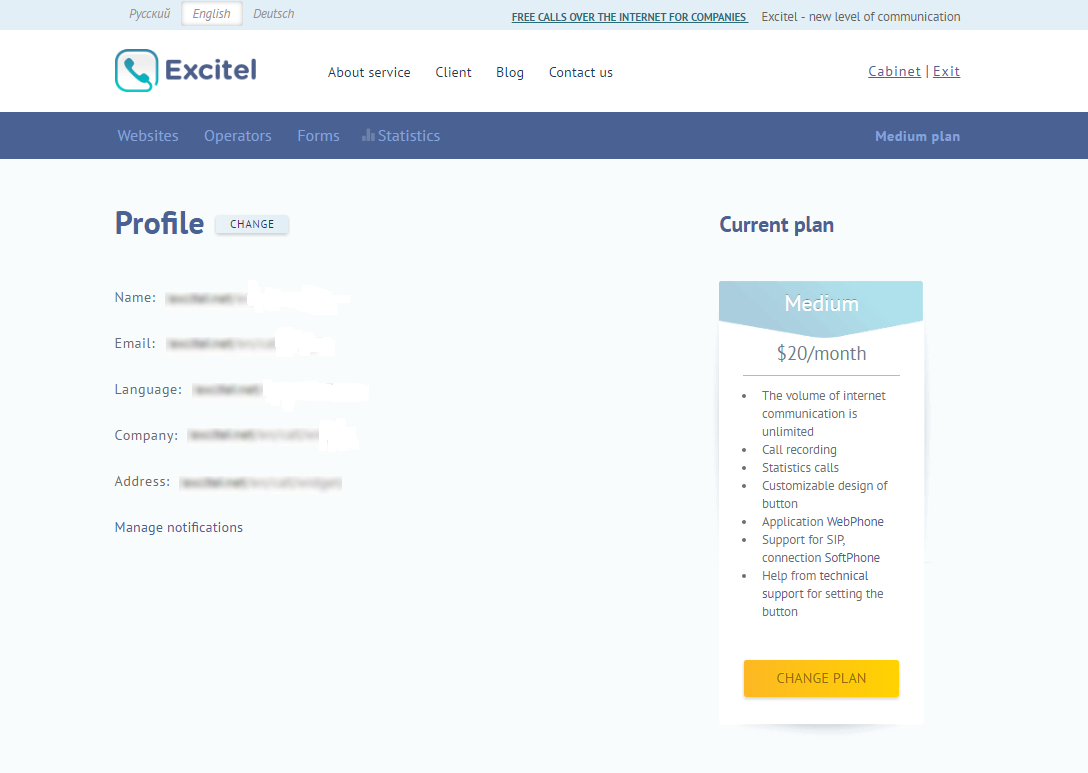
In "Profile" tab you can set up the notifications (notices of callback orders, weekly calls reports, service news) that come by email on address specified during the registration. To configure notifications click "Manage notifications".
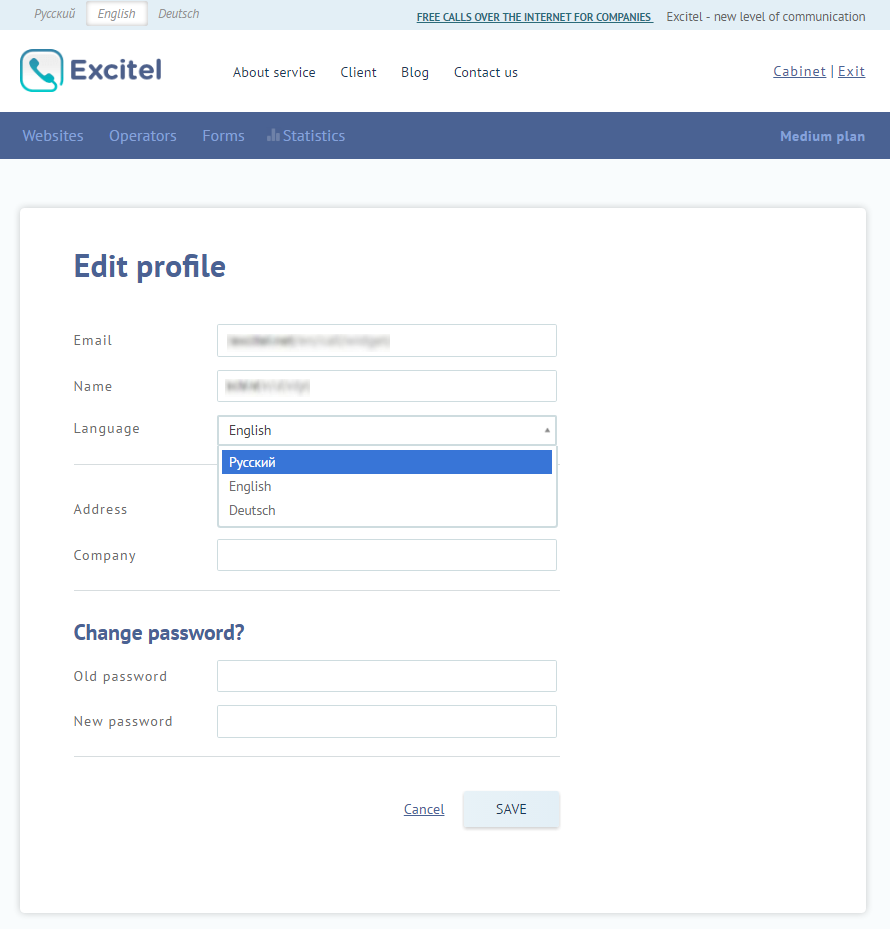
To change data submitted during the registering, you need to click "Change" link, which leads to the profile editor. In addition, you can also set the interface language. Excitel platform offers Russian, English or German by default.
Websites
Now let's study out the key settings of "Sites" menu section in detail. In this tab you configure the appearance and behavior of the widget. This menu appears after you have installed the button on your website:
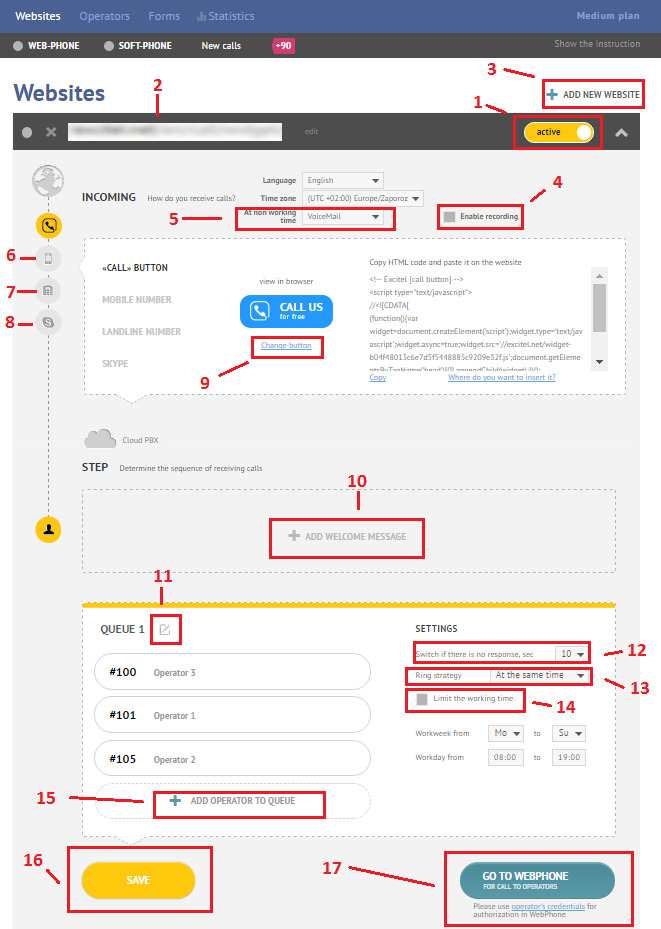
The website address where the button is installed now (2) and button activity indicator (1) are displayed on the top. Clicking the indicator you can change the status of the button from "Active" to "Inactive" and vice versa. That is important detail that changing the button mode to "Inactive" does not mean that the widget will not be displayed on the website, but that it will not take calls / voice messages / call back orders.
Within "Free" tariff plan one can install the call button only on one site. By using the "Medium" or "Enterprise" plan it is possible to install more than one button by clicking the "+Add new website" (3). If there are buttons on more than one domain, then the number of subsections under "Websites" increases respectively– each subsection responds to certain button and has an appropriate title (website address) and with specific settings.
Now, when the button is installed on the website, you can pass to its settings: choose the language in which to display all the links and tips in the call window; time zone (in accordance with it the call history will be recorded); the work of the widget during operators’ non-working hours (5). So, during non-working widget can receive voice messages or call back orders (choose one of the options from the drop-down list).
In this part of the menu, you can check the box "Enable recording" (4). In this case, all calls will be recorded and the site administrator will have access to the records in the personal account in the "Statistics" section.
Under call settings there is block with setting for buttons exterior. Clicking on the "Change button” (9) you pass to the Editor of button where you can configure the button’s color, size, position on the page and the text on it.
The option for customizing the greeting is below. By clicking on "Add welcome message" (10), you can download the audio file (max size 10MB, maximum duration - 5 minutes) which your web-visitor will hear when calling.
Next within "Sites" tab there is block for calls queue configuring. The queue of calls is the order in which the call will be routed to operators. It works like this: web-visitor presses the call button and the call is routed to the operator A. If the operator A cannot take the call or is out of place, then after a certain time (you can also set it by your own (12) the call is automatically conveyed to the operator B. To establish this order, add operators by clicking on the "+Add operators to queue" (15), and then drag the appropriate lines to build the necessary sequence. Above we have described an example of a sequential call completion. But there is another call completion type– synchronous - when the incoming call is routed to all operators at once (in this case an operator who was first to take the call talks to the caller). To configure the type of call completion select an appropriate option in the drop down list (13).
This block allows setting (14) the working hours for operators – days of the week and the hours during which widget will receive the calls from visitors. During non-working hours the widget will receive voice messages and call back orders.
Directly from the menu you can go to WebPhone to check the configured parameters and to call the operators (17). To log in WebPhone you will need login data for an operator from the letter with the title "Settings of operator" sent by Excitel service after registration.
All described options are used when you are going to receive calls in the browser with use of WebPhone. There are other options for call management – mobile (6) or landline (7) telephones, or your Skype ID (8). The realization of these ways of service use is possible within the framework of “Medium” and “Enterprise” plans.
After you've customized the appearance and call logic for the button click "Save" so that changes came into effect.
Operators
This menu section is designed for the management of available operators and creation (1) of new ones.
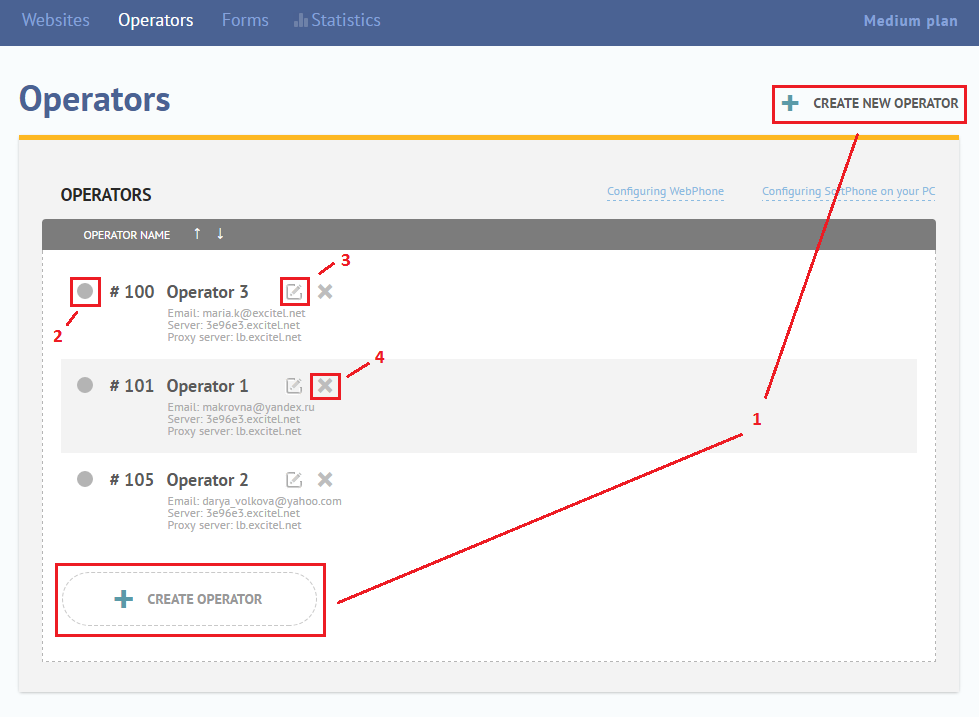
Information about the operators is presented in the list that contains operator’s additional number, his/her name (you can change the name by clicking the corresponding icon (3), email address, status. There are three types of statuses (2) – online (icon is green), offline (gray) and busy (red). To delete the operator’s account click on a special icon (4).
Forms
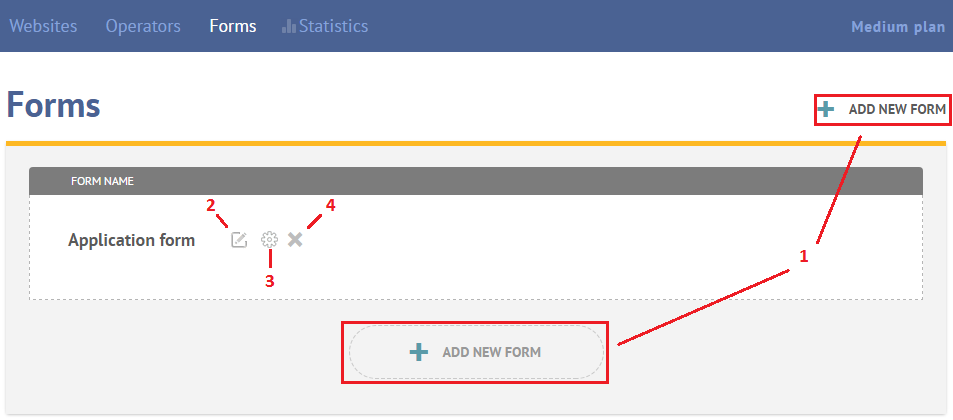
"Forms" menu is used to create (1), edit, and delete forms – questionnaires, which each operator can send during the conversation with caller. These questionnaires are created in advance by site administrator. There can be several forms, therefore they are presented in form of a list. Next to the name of each form there are special buttons that allow you to change its name (2), it`s fields (3) or even to remove it (4).
Clicking on the icon with the image of a gear-wheel (3), you pass to the form editor, where you can change the set of questions / fields for filling.
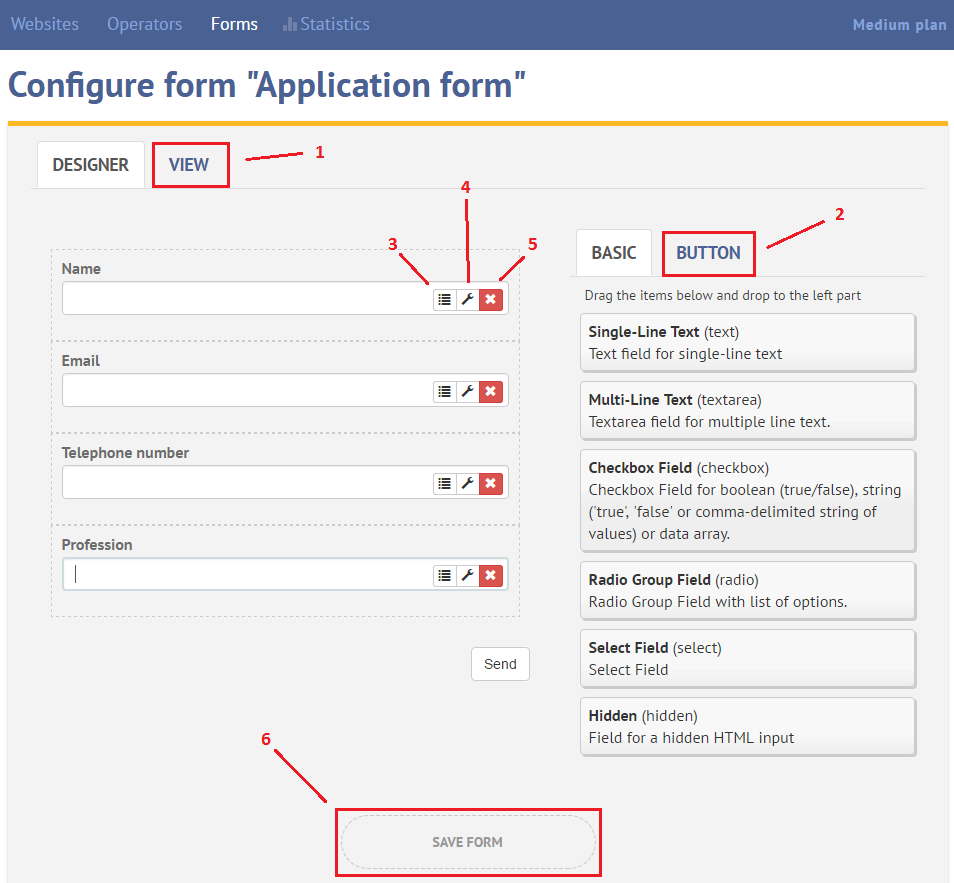
To delete certain field of the form just click an appropriate icon (5). Next to it there is the button for setting default values for each box (3). Clicking on the wrench (4), you can reset the name and tool tip for this field, and change some additional settings.
You can also set your own text on the button for submitting the form by the user to operator (2).
After making all the necessary corrections you can check out the result in the "View" tab (1). Then, to save changes, click "Save form" (6).
Statistics
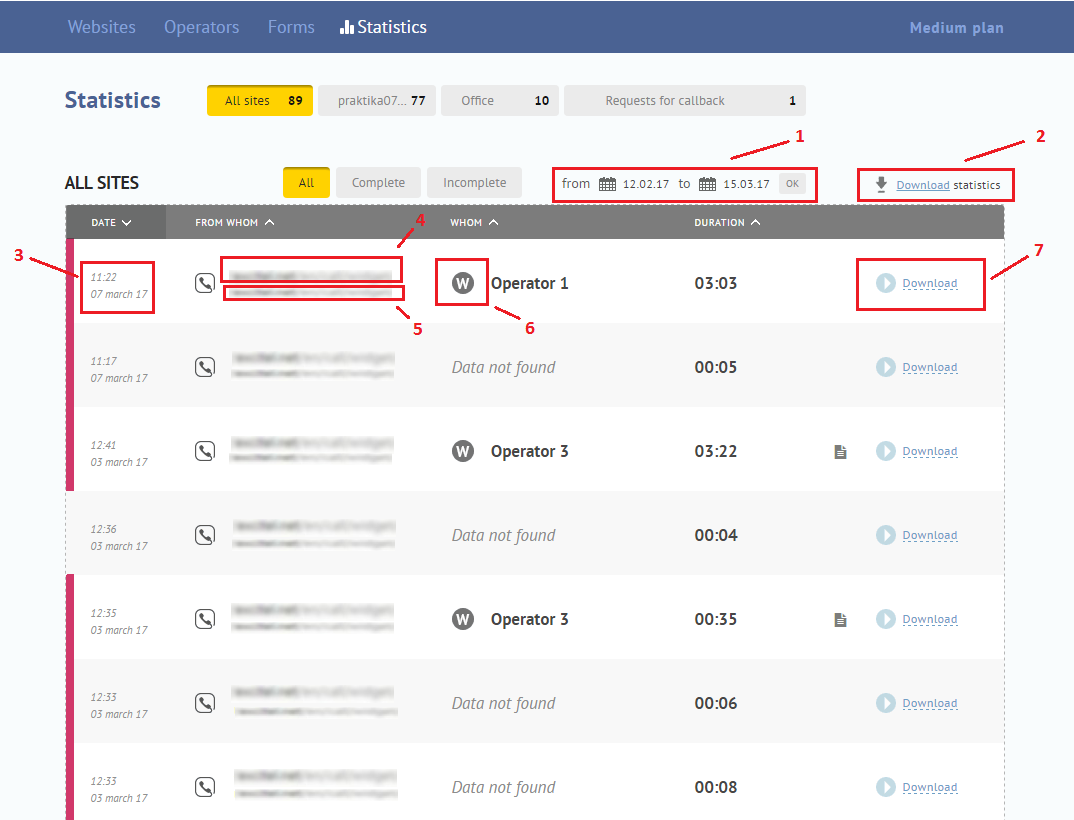
In the "Statistics" section all the data about the calls in Excitel system is systematized and stored. Call data are grouped into sections depending on where the call was made from - calls from the site (if you have more than one button on different sites, there will be a separate tab with the corresponding statistics pertaining to each website) and statistics of intra-corporate calls ("Office"). In addition, there is a tab "Requests for callback" with the corresponding statistics and the general statistics (for all the sites together).
In each subgroup ("All sites", "Site 1", "Office", etc.) there is statistics on the committed and missed calls, as well as combined statistics that contains all information about calls in this subgroup. Every day and without an exception the system stored all information on each call– date and time when it was performed (3); caller’s IP (4); city and country, where the call was made from (5); the name of the operator who answered the call; whether the call was taken with WebPhone or SoftPhone, etc. (6); the duration of the call and a link to download the conversation record (7). Above the table there is an option to download the audio record of all conversations by one file (2). If you need to see the statistics on calls over a certain period, you can use a special calendar to choose dates "from" and "to", and click "OK".
I hope we answered all the question that may appear during using Excitel system. In any case, you can ask our support team questions.